
Reference 4 is unsupported and discontinued since 2021. The Reference product line continues with SoundID Reference, learn more here:
→ Reference 4 system requirements and support status
→ What's new in SoundID Reference?
→ Upgrade paths for Reference 3 and 4
Get started with the Reference 4 Systemwide app to calibrate your systemwide audio - set up your output device, calibration profiles, and DSP settings.
In this article:
- How is calibration applied?
- First steps
- Main Dashboard
- Presets bar
- License information
- Check for updates
- Output selection logic in Systemwide
- MIDI mapping
- [WIN] ASIO/WASAPI output modes
- Frequently asked questions
How is calibration applied?
Systemwide is a virtual audio device software that will process your system audio and apply calibration to it when it is set as the default output of your computer.
Systemwide will automatically set your computer's output device to Systemwide (Sonarworks Virtual Audio Device on Windows). However, this feature can be disabled in the audio settings of the software. Find the 'Keep Systemwide the default system output device' checkbox in Systemwide settings.
If your output isn't affected by the calibration or there is no output at all, please make sure that the system's output is indeed set to Systemwide and that you have selected the correct audio device that you are using to output your signal to your headphones/speakers in Systemwide.
First steps
If you launch Systemwide but haven’t yet validated the software an activation screen will appear. Here you can either input your e-mail to start a free 21-day trial or use an activation key that you have received.
After you have done this you will be lead through an onboarding process which should give you a basic understanding of the Reference 4 software.
If the device you wish to activate the software on is not connected to the internet, you can still perform an offline activation to be able to use the software.
Learn more about it here.
Main Dashboard
This is the first thing you will see when you open the Reference 4 Systemwide after you have gone through all of the steps of onboarding and activation.
The dashboard encompasses all of the primary functions that you might need to use after setting the software up with your hardware.
Quick access calibration settings
There is a set of options surrounding the calibration visuals, which allow for calibration setting changes and outgoing signal adjustments on the go.
You can also monitor signal latency and its sources at the bottom of this section.
Presets bar
On the left side of the Systemwide app, you'll find the preset bar for easy switching between output devices and calibration profiles. You can create as many presets as needed for your device, output channel, and calibration profiles. Any changes you make to the DSP settings of your presets (like Filter Mode, Limit Controls, etc.) will be saved and remembered for the next time you engage them.
- Click on Add preset
- Select a calibration profile
- Assign the output device/channels you want to employ
- Name the preset and click Done to save
Presets can be operated in two different view options - Devices and Presets. In Devices mode, you will see your presets listed based on the output devices they're assigned to, while the Presets view is based on the calibration profiles you're using. You can add presets for any routing/calibration combination you desire. In the example below, see how the preset named 'KRK 6' (assigned to Scarlett 6i6 USB interface) is displayed in both views:
An automated preset rank list is also in place. If an output device is lost or disconnected, Systemwide will automatically apply calibration to a different device instead. It will also jump back to the device on top of the rank list if that device becomes available again, all based on the presets you've created and used previously.
License information
You can open the license information by clicking either on the SW logo on the top left corner of the Systemwide or the License information button in the settings drop-down menu on the top right corner.
This section of Systemwide allows you to see the active licenses and what e-mail are they registered to as well as to add a new product license.
At the bottom left corner of this section, you can also find out what version of Reference 4 is currently. installed
Dropdown menu
On the top right corner of the Systemwide, you will find a button that opens a drop-down menu for access to some additional features and settings.
Settings
By clicking on the settings line in the dropdown menu you can access certain options that cannot be changed in the main window. Among these are features that involve more specific functionality of the software than like output device and UI settings.
General
It allows you to change some of the user interface related features like software launch on start-up, whether Systemwide will use the GPU for graphics processing or the visual theme of the UI.
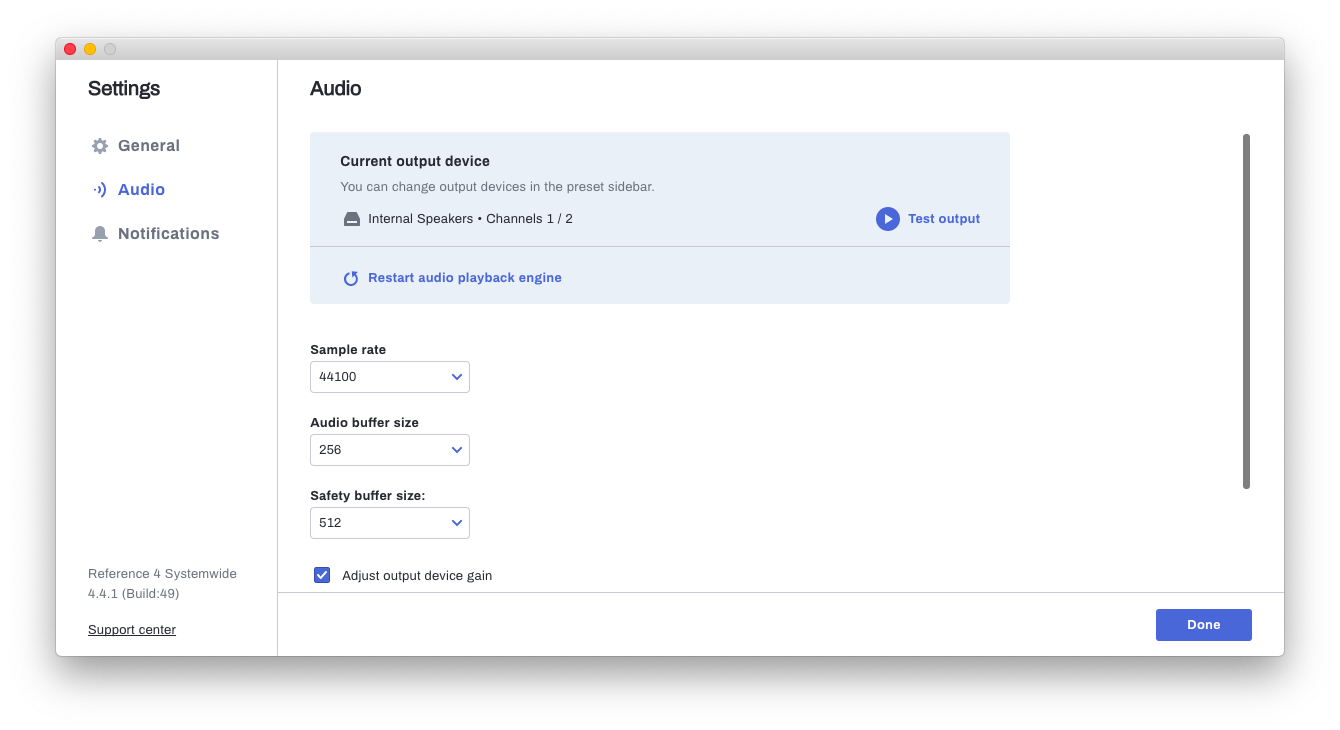
Audio
This section deals in general output settings of Systemwide and your interface.
You can reinitiate drivers and change the signal sampling values or other parameters defining how Reference will interact with the system audio drivers.
On Windows devices, you can use this menu to switch between ASIO and WASAPI output driver modes
Here you can also disable the automatic output takeover feature at the bottom of the audio settings window.
When enabled this feature would always set Systemwide as the default output device of your machine and apply calibration to the output device of your preference.
Notifications
We have made it possible for Systemwide to inform you of certain events that might be significant for your experience using the software. They can be accessed in the notifications window of the settings.
Check for updates
This feature allows you to find out what is the latest version of the Reference 4 software and download it.
Tray icon
To calibrate your audio Systemwide does not necessarily have to run on the foreground of your desktop. The SW tray icon will show up whenever Systemwide is enabled.
Tray icon allows for a number of quick access features, like switching presets or outputs, to enable/disable calibration and so on.
The placement of the tray Icon will differ for Mac and Windows computers but will work just the same.
Mac OS machines have the system tray (menubar) placed on the top right corner of the desktop
Windows users can usually find the tray icon at the bottom right corner of the desktop if left unchanged.
the color in which the icon is shown indicates whether calibration is active - blue for on and gray for off.
Output selection logic in Systemwide
Switching between multiple monitoring devices can be a bit of a hassle and can often take a lot of clicking around to switch over. For this reason, the Default Output Device setting is in place: Reference 4 Systemwide will always set itself as the system audio output device when launched. It will also revert to itself as the default output device if you're trying to select a different one. The automatic take-over is ON by default, but it can always be turned OFF in Systemwide app Settings > Audio > Keep Systemwide the default system output device.
If the automatic takeover is turned OFF, changing the system output will trigger a notification. This notification will contain a couple of choices: do nothing, or set the chosen device as output in Systemwide (NOT taking over the system output either way). A smaller checkbox will also give you the option to take over system output THIS TIME ONLY. There will be smaller informative notifications too, these can be turned OFF in Systemwide app Settings > Notifications, if needed.
See this support video tutorial for a demonstration of how this functionality works:
MIDI mapping
The MIDI mapping feature in Reference 4 Systemwide allows you to map parameters and control the app via an external MIDI device, allowing you to control the following options:
- Preset selection
- Bypass button
- Mono mode
Preset selection
- Navigate to your desired preset in the output prest panel (the left sidebar)
- Click on '⋯' (the preset menu) > Map MIDI
- The Listening for MIDI input... window will open up: press a key or a button on your MIDI device to assign
- Systemwide will confirm it has recognized the MIDI control; click Save
Calibration Enable/Bypass button, and Mono Mode
- Right-click on the Calibration Enable/Bypass or Mono Mode button
- The Listening for MIDI input... window will open up: press a key or a button on your MIDI device to assign
- Systemwide will confirm it has recognized the MIDI control; click Save
Clear MIDI mapping
You can reset all previously configured mappings from the Systemwide app Settings > General > Erase all MIDI mappings.
[WIN] ASIO/WASAPI output modes
Reference 4 Systemwide provides both WASAPI (Windows Audio) and ASIO support to benefit users with ASIO-exclusive devices. Systemwide use in DAW is also now possible with ASIO-exclusive devices like AVID HDX. The output mode selection is available in Systemwide app Settings > Audio > WASAPI/ASIO. Here are the key aspects of each mode:
- Output presets created in ASIO mode will not be available in WASAPI mode (and vice versa). If you wish to use the same output configuration in both output modes, a preset has to be created for each mode
- An 'ASIO control panel' menu is available in Settings - this will open the output devices ASIO driver settings
- Only ASIO-capable devices will show up as available output options in ASIO mode (and the same for WASAPI).
- In ASIO mode, the Sample Rate and Buffer Size settings in Systemwide control the respective settings of the currently assigned device's ASIO control panel (as opposed WASAPI mode, where Systemwide adjusts itself to the chosen audio interfaces' driver configuration instead).
- Adjust output device gain and Keep Systemwide the default output device automation features are unavailable in ASIO mode.
- ASIO mode reduces latency significantly.
Note that ASIO output mode is not a complete ASIO driver; it only handles the output part of the signal chain. Systemwide continues to use its WASAPI driver for the initial part of the signal chain, while the last section connects directly to the output devices' ASIO driver in Systemwide ASIO mode. This means that ASIO or WASAPI mode in Systemwide does not affect its connection with the DAW—you must run your DAW (or other advanced audio software) in WASAPI (often markes as "MME", "WDM", or "DirectSound" in DAW audio settings) to use Systemwide as the DAW output. For a clearer view of how the new ASIO mode integrates into the signal chain, refer to the chart below:
Frequently asked questions
Why does Reference 4 lower my output volume?
The output gain is lowered by default in the Reference 4 Systemwide app and DAW plugin due to the Safe Headroom feature. Safe Headroom lowers the output volume based on the highest peak in the correction curve to avoid clipping (gain staging-related audio distortion).
Safe Headroom is recommended to be used at all times, but can be disabled and the output gain maxed out.
Can I use Systemwide with my DAW?
Yes, the Reference 4 Systemwide app can be used as your DAW output instead of using the Reference 4 DAW plugin format. There are some key advantages of using it this way, but some sacrifices too. To achieve this, the Reference 4 Systemwide app driver must be assigned as the DAW audio output in DAW settings (see the example below).
Despite the advantages, it is recommended to use the Reference 4 DAW plugin format for your critical production work in DAW, as it is purpose-built for DAW use.
Note: [WIN] Reference 4 Systemwide will not be available as output in ASIO-exclusive DAWs on Windows (such as Cubase), as the Systemwide app is based on a WASAPI driver format to be compatible with the Windows Audio Engine (the Windows Audio Engine is WASAPI-exclusive).
Pros
- You don't have to remember to bypass your calibration before rendering your mix, as the calibration takes place outside of your DAW (no risk if imprinting the calibration EQ on the exported audio).
- No levelling issues associated with the Safe Headroom feature (no volume jumps that are generally associated with the render-bypass workflow with the DAW plugin)
Cons
- Adding the Systemwide app in the chain between your DAW and audio interface results in increased latency (around 20-50ms), which can become an issue is zero-latency monitoring is required. Despite having the same Zero Latency filter mode available as the DAW plugin format, the additional latency is introduced as a result of the Systemwide app running in the operating system audio engine chain.
- Using the Systemwide app as your DAW is subject to stability issues. Putting the Systemwide app virtual audio driver between DAW and the output device adds a lot of complexity in the audio configuration, as the app driver has its own sample rate and buffer size settings (which can vary depending on the driver mode used too), as well as various device management and automation aspects. This can result in unexpected behavior when key actions are taken (adding/removing devices, launching or quitting DAW, app and driver launch sequence on computer startup, sample rate and buffer size changes, slave/master and exclusive mode relationships and settings assigned to various components, etc.).
How to fully quit Systemwide?
The Reference 4 Systemwide app can be fully quit from the menu bar/icon tray:
What is Safety Buffer?
The Reference 4 Systemwide 4.4 update introduced a 'Safety buffer' feature, located in Systemwide Settings > Audio. The Safety buffer pre-buffers extra audio samples to prevent system requests exceeding available samples, allowing more time to address clocking issues and sync the audio stream.
Increasing the Safety Buffer can potentially help anyone experiencing audio dropouts during playback. If you aren't facing audio issues, you don't need to adjust the Safety Buffer. The default is '0' to minimize latency.
Note: The Safety buffer drop-down values can change depending on the Audio buffer size setting above.
0 comments